HTML5, CSS3, Javascript ONLY Photobooth with Image Download
So I decided that I wanted to challenge the concepts I know about online photo booths. What are those?
a) they must be flash
b) they must have a server component
c) they work in all browsers (hahaah - this example only works in Chrome at the moment).
What am I talking about? An online photobooth, with minimum javascript, HTML5, CSS, minimal images, that accesses your webcam and allows you to download your creations. Yup, take a shot of yourself, and maybe drag some sunglasses onto it or something. Want to see what I’m talking about? Check it out here: DEMO NO LONGER WORKS.
Now, let’s check it out.
Goals
My goals were simple:
- No flash / use HTML5 only
- Minimal amount of javascript: don’t you DARE import jQuery if you don’t need to
- Minimal css
- Somewhat responsive: spoiler alert, I gave up before I tested this - I started out ok though.
- Allow users to filter and add fun overlays to a webcam capture
- Download the finished product without hitting a backend server/prompting the user to right click.
Did I accomplish them? Heck yeah I did. Let’s see what’s up.
HTML5 Document
The first part of the HTML document is as follows:
<body class="modal needAllow">
  <header>
    <h1>Online Photo Booth</h1>
  </header>
  <div id="content">
    <div id="vidcontainer">
      <video autoplay id="video"></video>
      <div id="screenshotHint">Click to take screenshot</div>
    </div>
    <div id="videofilters">
      <h2>Add Filter</h2>
      <input type="radio" name="filter" id="filternone" value="none" checked>
      <label for="filternone">None</label>

      <input type="radio" name="filter" id="filtersepia" value="sepia">
      <label for="filtersepia">Sepia</label>

      <input type="radio" name="filter" id="filtergrayscale" value="grayscale">
      <label for="filtergrayscale">Grayscale</label>

      <input type="radio" name="filter" id="filterinvert" value="invert">
      <label for="filterinvert">Invert</label>

      <input type="radio" name="filter" id="filterhue" value="hue">
      <label for="filterhue">Hue Shift</label>

      <input type="radio" name="filter" id="filteropb" value="hue">
      <label for="filteropb">OPB Rainbow</label>
    </div>
    <p>
      The Online PhotoBooth is a completely free, 100% HTML5 (this means NO FLASH!)
      photo booth and webcam tool online.
    </p>
    <p>Take snapshots, apply filters, and share with your friends!</p>
  </div>
First, the class of modal and needAllow are on the body. The modal that is used for this application is purely css. It activates/deactivates based on the classes on the body. We’ll look at that more in the css and the javascript. Next of course is the header. I have this separate because I’m not going to blur out the header with the modal - just the body content.
Following that is the video. You’ll see that the video element is set to autoplay. If this is not true, when you send webcam to it, it will still require you to click ‘play’ to show the content. Below that is a hint to take a screenshot. When the user hovers over the video with the mouse, the icon changes to a small camera, and a click handler watches for a click. You’ll see that in the css and javascript.
Finally, the video filters are input buttons of type radio. This allows CSS3 filters to be applied to the streaming video. As a bonus, this same filter setting is applied to the screenshot.
Special note: Somehow, I totally didn’t think about the fact that the filters are actually on top of the element and not applied to the canvas image itself (referenced later). So the only real big unfinished bug is the fact that a downloaded image does not have the filter applied to it. I’d actually have to edit the pixels of the image.
The next section of the HTML document has the content for when a screenshot is taken. Obviously, this is hidden at load:
<div id="screenshot">
  <canvas id="mycanvas"></canvas>
  <div>
    <h3>Image Captured</h3>
    <p>
      <label for="imageName">Image name:</label>
      <input type="text" placeholder="My Photobooth Pic" id="imageName">
    </p>
    <p>If you want, you can <button>Download</button> the image.</p>
    <h3>Add Features</h3>
    <p>Use the following items to decorate your picture.</p>
    <p>Drag to position, hover + scroll mouse to resize.</p>
    <div id="screenshotdecorations">
      <img src="sunglasses.png" id="sunglasses" draggable="true" style="width: 150px; height: 54px">
    </div>
    <a href="#" id="closeScreenshot">x</a>
  </div>
</div>
The canvas element is where the captured screenshot will go. Then, the input field allows the user to name the file before they download it. If its not changed, the placeholder content is used for the filename. The download button allows the user to download. At the very bottom, the closeScreenshot link is put in the top righthand corner to close the screenshot. Fun fact: it also resets all the content on this page when that happens.
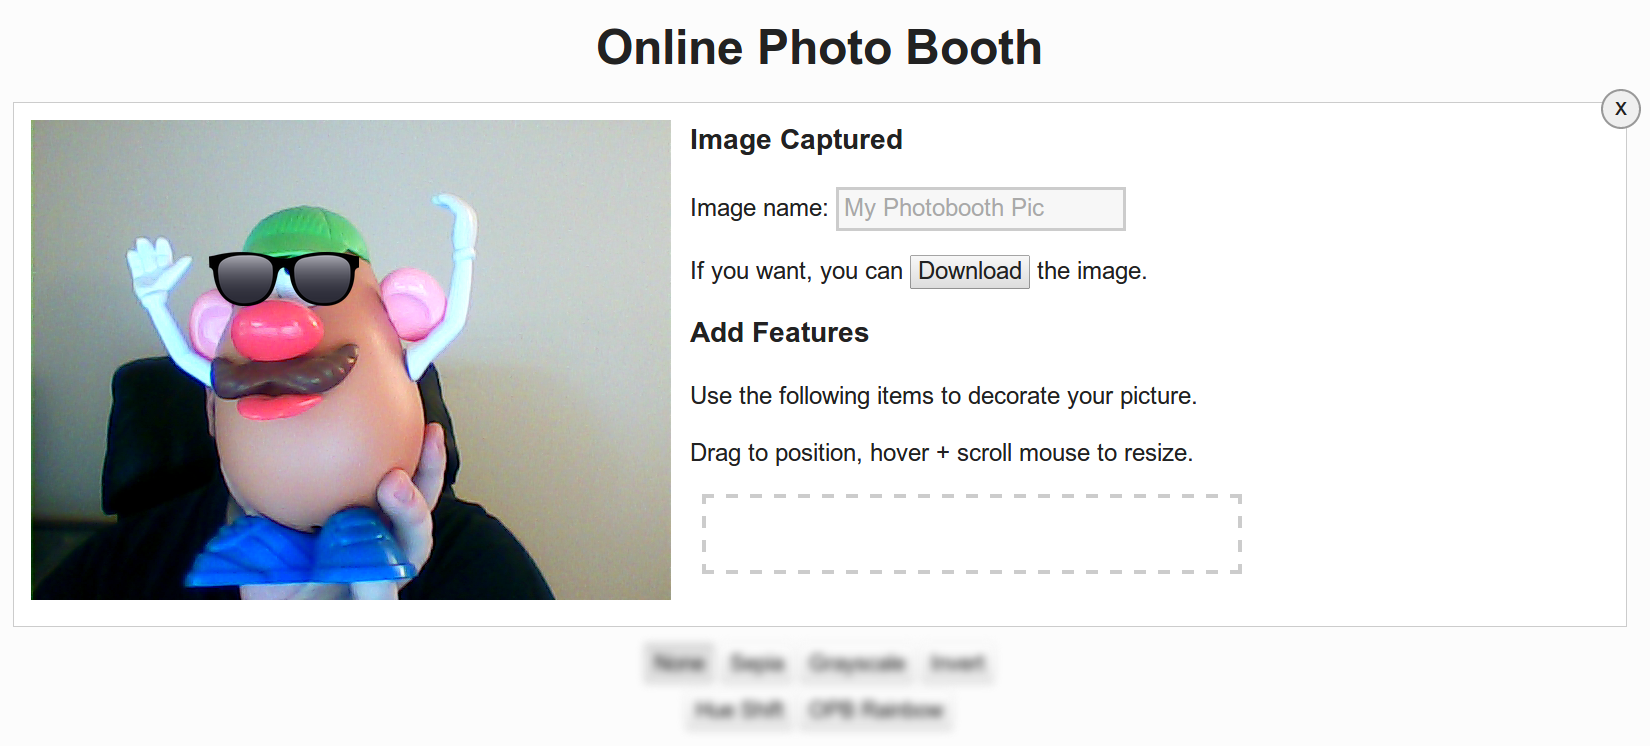
The screenshot decoration div allows for a list of draggable items that can be placed on the canvas. You’ll notice its using the HTML5 draggable attribute. This allows drag handlers to be written so that no additional javascript libraries are required. I initially wanted the image to also be contentEditable - but in Chrome, there is a bug that does not allow images to get resize handles when applied this. Most editors have a work around for that. Instead, I added a mousewheel handler to this to handle resizing. More on that later.
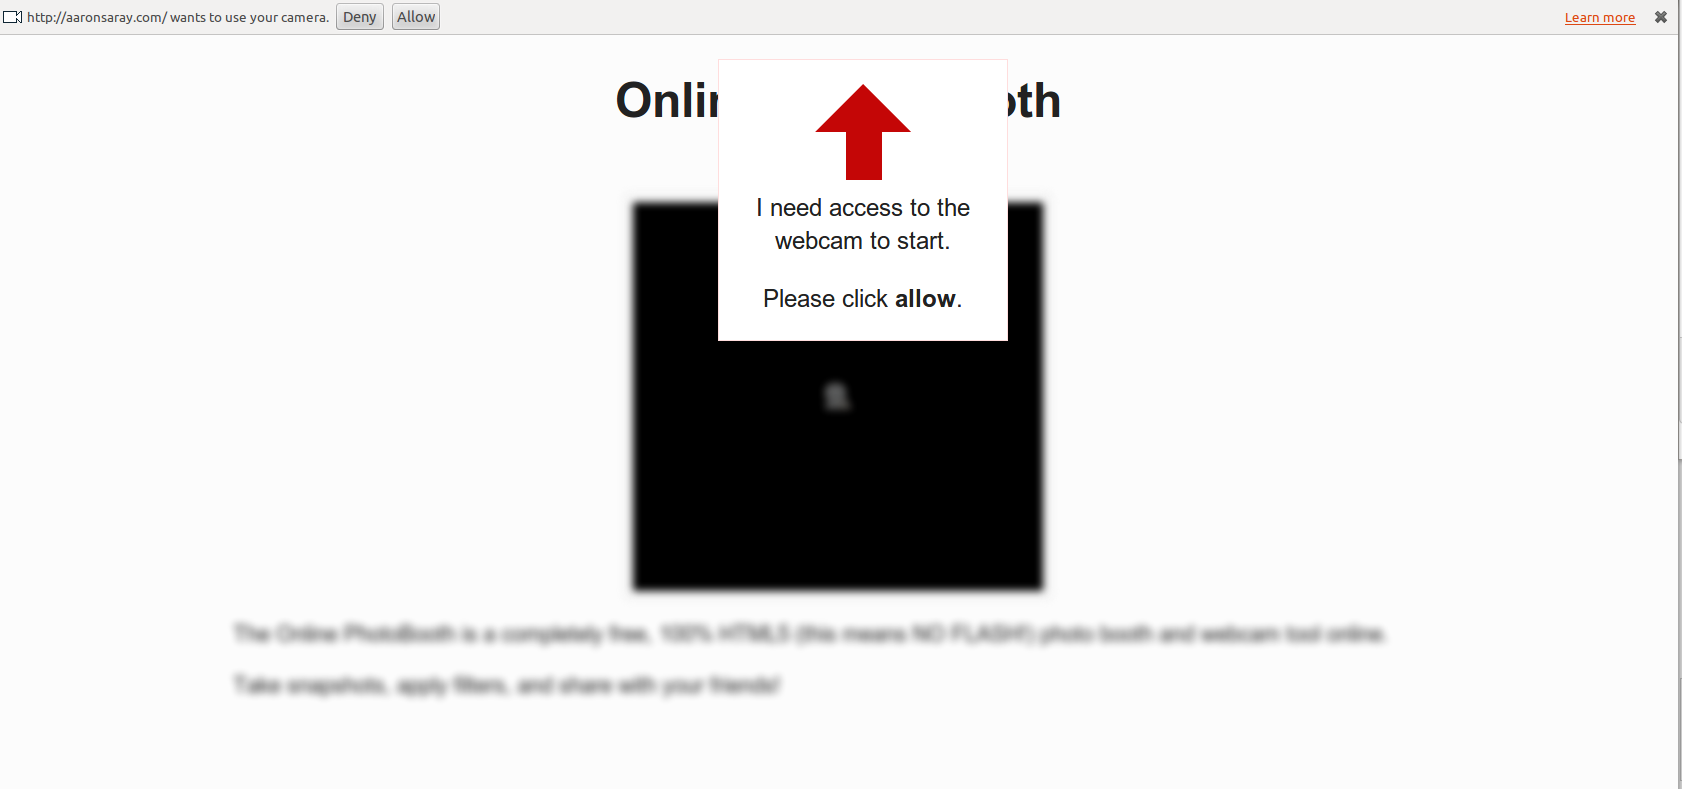
Finally, the HTML document ends with the following two message divs:
  <div id="allowMessage">
    <div id="upArrow"></div>
      <p>I need access to the webcam to start.</p>
      <p>Please click <strong>allow</strong>.</p>
    </div>
    <div id="browserRequired">
      <p><img alt="Chrome Logo" src="data:image/png;base64,iVBORw0KGgoAAAANSUhEUgAAABgAAAAYCAMAAADXqc3KAAABv1BMVEX////gKCrcpSY5jUHmQjvepyXfIifkODTjMzHwwhPnsyDWnChLtElCmkXrVEcyhEDoS0H60AruvBrnsyDcpSbWnChLtElFn0ZZmUBAlkTsW005jUHqVEcyhEDoS0HlPDffIifuYVHgKCr60ApAlkQ7kEI5jUHkODTjMzHywxfWnChLtElHpUfksCLepyVLtEn4zA/ywxfuvBr60ApSj8xFn0boS0HlPDfkODTjMzHgKCr0xw/uYVHfIidHpUdVkc2cvdzwa1mWvN5CmkVKisnkbR/hayLcpSbgaSdroNQ5jUHrVEfpUEThhIM7gsNJrkjfLjNLrkVrl73nsyBxo9NChcbmQjvqVEfZICVrotf80gm31Mf443/SgoS9z8Pj38DvzQzdvsOVmTJcpzzgemFYk86f1J1NoUT94Fbbu7+d0Zz32lDncR3wwhOQ043d17/ouySKzYjX2bzhY2LLwhjA3tFim9LZtyDksCLQWl2EwIYxe72Ms9ktebluxWsuda9ZdDEtdK0zc6duazGIsNcib63epyUlaaHy1TeRtS+poY3sW02dKh3KGh7aISW9KiN5qdHSKyibsCWNXzFzo8tjvR7gAAAAL3RSTlMAEREREREREREiIiIiIiIiIoiIiIiIiIiIiIiIiIiIiIjMzMzMzMzMzMzMzMzMzHLBVYcAAAFFSURBVHhenc1TdyRRFIbh6tA2Bt2x5pTZth3atm1j/INTZwed3PZ7+T1rr00kXUGN1mKx6LV1RZ8g7Svve9Dr9Q8+P/8tMwFZzQLP+3t8PX6+WxBbNG+g0Umi0A0JgijJuoxXqPojS2FJxEmSLBsM318gD/37aZBleSMQmHS7nU6HYzEboAJFfvUawnNmq9W8skovKSRTDNCO0MVT75jH0xfv84ww/Wr1AAihyOPepWlbzXS4gIEBCKlyOjRlt7Msa48PYiDfAd2zwWBXVzC4jYH5AMu/jw5w/2cxKAAdIFtnV2on63DQClAJcDwQvTmPDt9ioEoA8jkQtDY9v/8XdiqHgKqxQBOj6mOFLiVeSm3gQkChTYYkKbozHQNIo81oVPc7haLo2I8UIlGt18ZxMzt0bPe6jPhU4Zcm77jL1VaeSyTbMwzgX5gEAF+4AAAAAElFTkSuQmCC"> Ruh Roh!  You're not using Chrome or it's failing for some reason.  This was only created using Chrome on the Desktop.  I can't guarantee anything else.</p>
    </div>
    <footer>
      <a href="http://aaronsaray.com/contact" title="Contact Aaron">Contact</a>
    </footer>
    <script src="main.js"></script>
  </body>
</html>
The first is the allow message that hovers over the top of everything when the class needAllow is on the body. This let’s the user know that they need to click the allow button on the browser. Additionally, the ‘up arrow’ is just a div on this screen. The red arrow will be created using only CSS.
The browser required div is for times when the browser is not identified as Chrome OR it is chrome, but an older version, and one of the required features does not exist. You’ll notice the chrome logo is embedded. I didn’t want to hit the server for this very small image.
The CSS
Now, let’s take a look at the CSS.
video, canvas {
  display: inline-block;
  *display: inline;
  *zoom: 1;
}
html {
  font-size: 150%;
  -ms-text-size-adjust: 150%;
  -webkit-text-size-adjust: 150%;
}
html,button,input,select,textarea {
  font-family: sans-serif;
}
body {
  margin: 0;
}
h1 {
  font-size: 2em;
  margin: 0.67em 0;
}
h2 {
  font-size: 1.5em;
  margin: 0.83em 0;
}
h3 {
  font-size: 1.17em;
  margin: 1em 0;
}
strong {
  font-weight: bold;
}
p {
  margin: 1em 0;
}
form {
  margin: 0;
}
button, input, select, textarea {
  font-size: 100%;
  margin: 0;
  vertical-align: baseline;
  *vertical-align: middle;
}
button, input {
  line-height: normal;
}
textarea {
  overflow: auto;
  vertical-align: top;
}
html, button, input, select, textarea {
  color: #222;
}
body {
  font-size: 1em;
  line-height: 1.4;
  background: #fcfcfc;
}
img {
  vertical-align: middle;
}
The styles here are mainly just grabbed from HTML5 boilerplate - I stripped out all the stuff that I wasn’t using. This isn’t that exciting. Let’s look at application specific css next:
header {
  text-align: center;
}
#content {
  width: 80%;
  margin: 0 auto;
}
footer {
  position: fixed;
  width: 100%;
  bottom: 0;
  background: #ddd;
  border-top: 1px solid #ccc;
  font-size: 0.5em;
  text-align: right;
}
footer a {
  text-decoration: none;
  color: #135;
  margin-right: 0.8em;
}
This is just the setup for the site. Nothing special here.
#vidcontainer {
  width: 19em;
  height: 18em;
  margin: 0 auto;
  border: 1px solid #ccc;
  background: #fff;
  padding: 0.3em;
  cursor: url(data:image/png;base64,iVBORw0KGgoAAAANSUhEUgAAABgAAAAYCAYAAADgdz34AAAABmJLR0QA/wD/AP+gvaeTAAABdElEQVRIie3UPUtcQRTG8V/MEgSjYgo7CwNJYSq7dAp2CQhBrKxshVQKtksaP4FFihBMIaYIglXShYhFUugX8K2wMcUG0gQTZFPMubBe1t25cdP5wOHee2bm/5y5nBlu1QOtonlNrN4UXu8AL6L+P+FZJsN4jUYFYLdoBHMI3vUQXI6NO+E2kv3jqqkhs5I9PMODKOY59jPXdp2wibttquvHwU0NGlITlDWH017sYKMN/FWMHWMJj/EQU1LDXFYxWCvB5yP/CQORm3b1HMziItdgq2VhDSc4wv2WfL0AtehlrsFPjMaiqcgtlWDtDGo4R7OmswbxFi8wGbnP0m+Zju/iWS+Z7krNkNUJ37Ad72O631OisCb8yDQpYqa0y8KsrD2c92GnzWAnLWbMmcBTfCC127r82/RSujau28G9qP5COiOVNCq16S+pFftK448C3sRyVXihcXwNyBne4w2+4Df+YOVf4YVqWMBHfA/oYRg9aZ34F2NlAxzygZMqAAAAAElFTkSuQmCC), pointer;
}
#video {
  width: 100%;
  height: 100%;
  background: url(data:image/png;base64,iVBORw0KGgoAAAANSUhEUgAAACAAAAAgCAYAAABzenr0AAAAAXNSR0IArs4c6QAAAAZiS0dEAP8A/wD/oL2nkwAAAAlwSFlzAAALEwAACxMBAJqcGAAAAAd0SU1FB90GAQADLEx9CLQAAAiGSURBVFjDvZd/bFXVHcA/5/547/XH6+sP2kKRUh70FYvCEIxQpQWmC6gzM4jgD6ZOp8skGqfTgVPGCG7qEsOCWTaZumQ656+gM9EIQsEVKv6oQIK0tKAttE/KD/te+97rvfecsz/uawMohWzJTnKSe8+955zP+f4+gnO0tU88GbMDgWmmaVYLIaxTv2mtPSnlAddxdj+68pE2/osmzvbh0cdWjY1ECm/PyckxM5kMAIZhcAYAWuuhZ9nX982La9esPvK/AojVa564tqiocHpOTg6HDh7Ctm0Mw/gWgFIKpRSu6xKNRkmlU5w8+U3LqsdWvgPo8wEwz3g3Vq1euzg6IXrx9T+6jhmXXEJ5eTmftnxGOpXGdV1c18VxHDKZDKlUCk963Lx0KfPmNTB5coxjx0+MmTptevm2xi1fnA/EqQDi14+v/uHEaNVFV1+9AKUVUkrKS0tpmFuPRtPZ2Ulv73FSqTR5eTk0NNRzxx23UVRSTCadRilNbNIkenuPj7po6rSC7dsa285bBcuX319ZWVV1+42LF2FZvq1ZpokVCBC0bULBIJbtj7e1thKrqcGTkkwmg+M6eI6HpxQojSc9Xnn1dbq+/PLF9evXdY4EMKRUq7ikZFlD/RyEEHieh9YapTVKSjwpcVwX1/UAGHRdpFK4roP0JEr6/2op8aSHEIL5cxsoLilZBlgjAVgA9y6/LxYpjJhlZWW4rochBEIIDMNACEEymWRHUzOtB1pxBh0QglDwbapjNVxRN4tQKAcYAlYorSktLSVSGDHvXX5f7Nn1f9w3EoCZm5c3tba2FtdxfKUYBoYyEAh6e4/x9ltvUz+njiVLFp02uXnHDv7y3F+56aalRCIRlNJIpZDS944ptVPoicenAq2APBuAZZlWtLSsDM/zwBCYGkwTkskEL730Misevp+9X8Mt6z9hUGmkEAQCNiuvncYjD17IE0+tY9myWwmFglnXlCgFZWWjsE0rmt1Hns0GTK21lRcKIZVCSZUNLpoPm3Zw5fwGWo5I/tHUxdqbpnDfwmoWz67kogmFPLCxg7aEzVXz6/l3UxNag9b+6aWU5ObmorW2vsPdTwMQSg+JTg5P1lrR1trG3Dl1/GnzQX5xbTWHTgzSmXToHlQckybFo/JZ19xLw5zZtLW2ZU+v/XWk9FXhR0oxohFqpXwA5Z9eAEpq0uk0WCYuJl+dHORI0iGegbhj0G8FyC+06Et5YJqk0qlh+KEIiWGgleKcXqCyopdKoQFhGLhKIj0XPA9lCA73OcQzirhjkLRscvNtPFcxiAOui3I9pJTDXcMwzDkBtNYykUiYoVAQiQDDw/RMTNumv78f0zQ4eCJDr+efPDffJhDORaclpUAyOYBp20jP87uUaAEDAwNoreW5ApHu7+/v7In3oDVIqZCuxHNcqsZX8f7mRu6pG8W2jgTdSRelFJ6ncDKSjKdZOtZl0weNVFVV4XgeXjZwaaXp6fmaZP9A50g5wQBkd/eR/R3tHdm0qvA8P/LNvHQm72/aQoV5kl9dESHPhGRG0dfvIlJpbiv5hqLEYd7/YCuXXjrTT1bSj6Iawd59++k83P3F2VxwOBm1tbWmpky5eGZ5ebnIyclBaYnWmmAgwIRolA0bXqAspPnJ7HEsqjK5pszjslCCPU2NvPzP17nhxiXk5+fjuS5KarSAnqPH+XR3a+aNlzdsBtJnk8KQe+TOrrs8Vl8/97oFCxf4eV+BsASWaZFKpWhubqbjwAEGM4MIIQiEglRPqmbWrFmEcnPwPA+lFWDgStj67kZuDf8LVwR5aWff00+9cyg9UjrWh7u60lVVE4rSg07JhMoqpM4mGamwbZtoNMqMGTO5+ZabyS8IM3/+fMaPH48wDH9zqRAIhGHywfad1LnvMWXOVYQvqKEkcyT2/Paez75LCkMACtB79+zuGTOmojTZnyysqBiLYQi/LlAS6Uoc6VEQDtPR3kFubh6e6+Ip6UdAIZCepPHDHdjxj52G8Z459pqfklMRI9HWkjdvUij+2q6jx0YqSBSg9u7ZfbggEgn0Hu0tLy4qJi8vH6U0Gj/JFBcV0nHwIOFwgU+tNYYQ9B49yuYtW2nfv3ffXeP2llx4/c9MQ3fCYA+F42aQbt81ZcP2eFN2n9PjwJAaAGfN2t83hEKhmoGBATZt2kQ4P5/JtbWUl5eTn5eHaRgopTEMg0QiQTweZ/++L0gODDCmciLzS4/UjqldiFlRxqJ7PwfgjWd/QMUlV7H5EbHwyidbTqsXTwUQj/9mzaJYrLqmpGSUPyAEXV2ddH7VyectLSQSCV/PArZu2UI4HKaiooLvzZjOBZVRdLKbsj1vMqb+Dmhfg2Cqv3L704yrX8XR1s+nP3Nrzc4H/t567EwAsWLFY4unTr148ujRo1FDOUEIJk6cRHV1NSJbpHy7LAeFQBlB7I/+RtWCOyH+JshjDLpZ95fHIP4Gkxb+mFTimRuA54ZigwEYDz28csnsy2dPjkYnEAwGCIYChEJB/zloY9sWtm1iWad327awAzbBnDyCX75HSXGYgtIkJD6BQAGJhEsi4UKgABIfEyk5SVnNzLJ3H5o+aygEWIClpYxdc/VCMpnM8EXjvJthIz2Xto0bid15F3z9AthhMGDbunb/n0wu2ED8NWquvJu+r1q/D+wCXAuwBp1BDAE7m3chBN8S9UhFtTKDBFv+zMTLZkHqLQiFfcFaiqV/mAvAKw82gmn4DjDwJpV1V7B1RWrRvN99/KoFiKGUOXp0GQgQnCeAEEgjF3WimTG11WAEQAWzdaXmld9+lLWBPFDCt31DMzq2n+5dgRhgWYAeGBjouvuen48bEv/5AigEDgF+OS7IrufjKAXo7Fyhh1fRnDFuCAzTNwEBBIAIkHvKPeH/0TLASZHd1Mp28X8EkID7H2/lScbIXFYeAAAAAElFTkSuQmCC) no-repeat center center #000;
}
#screenshotHint {
  display: none;
  background: #cfffcf;
  font-size: 0.7em;
  font-weight: bold;
  margin-top: 0.2em;
  text-align: center;
  border: 1px solid #afa
}
#vidcontainer:hover #screenshotHint {
  display: block;
}
The video container information is defined. The video is set up to have a small image of a webcam as the background before it is initialized with streaming content. The video itself has a small image of a camera icon as the pointer when you hover over it - as kind of a reminder that you can take a screenshot. The screenshot hint is designed to appear below the video - and only appears on hover.
#allowMessage {
  display: none;
}
.needAllow #allowMessage {
  display: block;
  position: absolute;
  top: 1em;
  left: 50%;
  margin-left: -5em;
  width: 10em;
  background: #fff;
  border: 1px solid #ffdddd;
  padding: 0 1em;
  text-align: center;
}
.modal #content {
  -webkit-filter: blur(5px) grayscale(90%);
  -webkit-transform: scale(0.9);
}
#upArrow {
  width: 0;
  height: 0;
  border-left: 2.0em solid transparent;
  border-right: 2.0em solid transparent;
  border-bottom: 2.0em solid rgb(196,6,6);
  margin-top: 1em;
  margin-left: 3em;
  margin-bottom: 2.5em;
}
#upArrow:after {
  content: "";
  background: rgb(196,6,6);
  width: 1.5em;
  height: 2em;
  display: block;
  position: relative;
  top: 2em;
  left: -0.7em;
}
This is the css for the allow message. Basically, it is not displayed unless the needAllow class is above it. Then it positions itself absolutely centered and near the top. The modal css uses webkit filters to gray out the content, blur it, and then shrink it a tiny bit. This gives a good 3d modal look. Finally, the up arrow is using CSS to create a triangle shape using borders. After it, another rectangle is added to be the base of the arrow. There was no need to actually have this in the HTML using this technique.
Now, chrome message CSS is pretty simple. Show it on top if its required.
#browserRequired {
  position: absolute;
  top: 0;
  width: 100%;
  background: #faff00;
  font-weight: bold;
  font-size: 0.7em;
  display: none;
}
#browserRequired p {
  margin: 0.7em;
}
Next, the filters:
.needAllow #videofilters {
  display: none;
}
#videofilters {
  width: 19em;
  margin: 0 auto;
  text-align: center;
}
#videofilters h2 {
  margin-bottom: 0.5em;
}
#videofilters input[type=radio] {
  display:none;
}
#videofilters input[type=radio] + label {
  display:inline-block;
  padding: .2em .4em;
  margin-bottom: .35em;
  border-color: #ddd;
  cursor: pointer;
  background-color: #f5f5f5;
  background-image: -moz-linear-gradient(top,#fff,#e6e6e6);
  background-image: -webkit-gradient(linear,0 0,0 100%,from(#fff),to(#e6e6e6));
  background-image: -webkit-linear-gradient(top,#fff,#e6e6e6);
  background-image: -o-linear-gradient(top,#fff,#e6e6e6);
  background-image: linear-gradient(to bottom,#fff,#e6e6e6);
  background-repeat: repeat-x;
  border: 1px solid #ccc;
  border-color: #e6e6e6 #e6e6e6 #bfbfbf;
  border-color: rgba(0,0,0,0.1) rgba(0,0,0,0.1) rgba(0,0,0,0.25);
  border-bottom-color: #b3b3b3;
  filter: progid:DXImageTransform.Microsoft.gradient(startColorstr='#ffffffff',endColorstr='#ffe6e6e6',GradientType=0);
  filter: progid:DXImageTransform.Microsoft.gradient(enabled=false);
  -webkit-box-shadow: inset 0 1px 0 rgba(255,255,255,0.2),0 1px 2px rgba(0,0,0,0.05);
  -moz-box-shadow: inset 0 1px 0 rgba(255,255,255,0.2),0 1px 2px rgba(0,0,0,0.05);
  box-shadow: inset 0 1px 0 rgba(255,255,255,0.2),0 1px 2px rgba(0,0,0,0.05);
}
#videofilters input[type=radio]:checked + label {
  background-image: none;
  outline: 0;
  -webkit-box-shadow: inset 0 2px 4px rgba(0,0,0,0.15),0 1px 2px rgba(0,0,0,0.05);
  -moz-box-shadow: inset 0 2px 4px rgba(0,0,0,0.15),0 1px 2px rgba(0,0,0,0.05);
  box-shadow: inset 0 2px 4px rgba(0,0,0,0.15),0 1px 2px rgba(0,0,0,0.05);
  background-color:#e0e0e0;
}
Here I am not displaying the filters until the user has access to the camera. Then, the video filters are basically a set of radio buttons. I don’t want more than one filter at a time. Finally, the other css there is a combination of styles from twitter bootstrap and somewhere else that basically set the labels as ‘buttons’ for the radio input buttons. When a radio button is checked, the label looks selected.
Now, moving on to the screenshot CSS.
#screenshot {
  display: none;
  position: absolute;
  top: 5em;
  left: 2%;
  background: #fff;
  width: 94%;
  padding: 1%;
  border: 1px solid #ccc;
}
#closeScreenshot {
  background: #efefef;
  border: 2px solid #999;
  border-radius: 3em;
  display: inline-block;
  width: 1.5em;
  height: 1.5em;
  text-align: center;
  position: absolute;
  right: -0.6em;
  top: -0.6em;
  color: #222;
  text-decoration: none;
}
#screenshot h3 {
  margin-top: 0;
}
#screenshot div {
  vertical-align: top;
  display: inline-block;
  margin-left:0.5em;
}
#imageName {
  padding: 5px;
  border: 3px solid #ccc;
  background: #f7f7f7;
}
#screenshot button.downloaded:after {
  content: "\2713";
}
The screenshot window is not shown by default. It’s loaded when a screenshot is taken. Its positioned on top of the content - and the body modal class is added back. At any rate, the close screenshot link is placed in the corner of the screenshot window. The only other interesting css is the button.downloaded class which adds a checkmark after the content of the button if someone downloads something (and the css class is obviously added.)
Finally, let’s look at the draggable decorations CSS.
#screenshotdecorations {
  position: relative;
  border: 0.2em dashed #ccc;
  padding: 0.5em;
  width: 100%;
  height: 2em;
}
#screenshotdecorations img {
  position: absolute;
  height: 2em;
}
#sunglasses {
  top: 0.3em;
  left: 0.3em;
}
So I kind of cheated - I was getting tired - this only took me about a day… and I knew I’d only have sunglasses. But basically, I just made a gutter for the decorations, and absolutely positioned the one that I have. Nothing big.
That’s it - now let’s look at the javascript. I promise, for what it is… it’s small!
Javascript
Remember, the goal was to use the least amount of javascript. I’m going to start a little bit different than normal - I’m going to start at the bottom of the document.
First, a Javascript base64 to ByteArray function (because you can’t do this natively) - got this from a github entry.
/**
 * source: https://github.com/danguer/blog-examples/blob/master/js/base64-binary.js
 * base64 to binary
 */
var Base64Binary = {
  _keyStr : "ABCDEFGHIJKLMNOPQRSTUVWXYZabcdefghijklmnopqrstuvwxyz0123456789+/=",

  /* will return a  Uint8Array type */
  decodeArrayBuffer: function(input) {
    var bytes = (input.length/4) * 3;
    var ab = new ArrayBuffer(bytes);
    this.decode(input, ab);

    return ab;
  },

  decode: function(input, arrayBuffer) {
    //get last chars to see if are valid
    var lkey1 = this._keyStr.indexOf(input.charAt(input.length-1));
    var lkey2 = this._keyStr.indexOf(input.charAt(input.length-2));

    var bytes = (input.length/4) * 3;
    if (lkey1 == 64) bytes--; //padding chars, so skip
    if (lkey2 == 64) bytes--; //padding chars, so skip

    var uarray;
    var chr1, chr2, chr3;
    var enc1, enc2, enc3, enc4;
    var i = 0;
    var j = 0;

    if (arrayBuffer)
      uarray = new Uint8Array(arrayBuffer);
    else
      uarray = new Uint8Array(bytes);

    input = input.replace(/[^A-Za-z0-9\+\/\=]/g, "");

    for (i=0; i<bytes; i+=3) {
      //get the 3 octects in 4 ascii chars
      enc1 = this._keyStr.indexOf(input.charAt(j++));
      enc2 = this._keyStr.indexOf(input.charAt(j++));
      enc3 = this._keyStr.indexOf(input.charAt(j++));
      enc4 = this._keyStr.indexOf(input.charAt(j++));

      chr1 = (enc1 << 2) | (enc2 >> 4);
      chr2 = ((enc2 & 15) << 4) | (enc3 >> 2);
      chr3 = ((enc3 & 3) << 6) | enc4;

      uarray[i] = chr1;
      if (enc3 != 64) uarray[i+1] = chr2;
      if (enc4 != 64) uarray[i+2] = chr3;
    }

    return uarray;
  }
};
This is important for later: we need to create a base64 from canvas image into a ByteArray to pass to an HTML5 blob.
And here we go: On load, check to see if this is chrome. If its not warn them. Either way, continue on.
document.addEventListener('DOMContentLoaded', function() {
  if (!window.chrome) {
    photoBooth.showBrowserWarning();
  }

  (function(){
    var videoStream = new photoBooth.videoStream();
    videoStream.initCam();
  })();
}, false);
The only thing notable of course is that I’m going to scope the creation of my videoStream inside of the anon() function. Alrighty, let’s move on:
/**
 * set up namespace
 */
var photoBooth = photoBooth || {};

/**
 * static function to show warning
 */
photoBooth.showBrowserWarning = function() {
  document.getElementById('browserRequired').style.display='block';
}

/**
 * static function to remove the reminder
 */
photoBooth.hidePermissionReminder = function() {
  document.body.className = "";
}
The comments make it pretty simple. I’m creating the namespace and adding a few helper functions. Next, here is the constructor and ALL of the methods. Don’t worry, I’ll go through them - but I thought splitting it up would make it more confusing.
/**
 * Constructor
 * This handles the manipulation of the current video stream
 */
photoBooth.videoStream = function() {

  /**
   * Start the capture
   * Also checks to make sure required features are available
   * returns whether we can continue or not
   */
  this.initCam = function() {
    navigator.getUserMedia  = navigator.getUserMedia || navigator.webkitGetUserMedia || navigator.mozGetUserMedia || navigator.msGetUserMedia;
    window.URL = window.URL || window.webkitURL;

    if (!navigator.getUserMedia) {
      photoBooth.showBrowserWarning();
      return false;
    }

    // good to continue

    /**
     * Do the initial capture to just wake us up
     */
    navigator.getUserMedia({video: true}, function(videoStream) {
      photoBooth.hidePermissionReminder();
      _initializeStream(videoStream);
      _initializeFilters();
      _initializeScreenshot(videoStream);

    }, photoBooth.showBrowserWarning);

    return true;
  };

  /**
   * defines the video element
   */
  var _video;

  /**
   * defines the canvas element
   */
  var _canvas;

  /**
   * define the canvas context
   */
  var _canvasContext;

  /**
   * The input box for filename on screenshot download
   */
  var _filenameInput;

  /**
   * Used to download images
   */
  var _downloadButton;

  /**
   * defined to be used as a constant for toggle function
   */
  var _TYPE_SHOW = 1;

  /**
   * defined to be used as a constant for toggle function
   */
  var _TYPE_HIDE = 0;

  /**
   * Starts the stream because we have permission
   * @private
   */
  var _initializeStream = function(videoStream) {
    _video = document.getElementById('video');
    _video.src = window.URL.createObjectURL(videoStream);
  };

  /**
   * This is used to address the handlers for applying filters to the video stream
   * @private
   */
  var _initializeFilters = function() {
    var filters = {
      filternone: "",
      filtersepia: "sepia(100%)",
      filtergrayscale: "grayscale(100%)",
      filterinvert: "invert(1)",
      filterhue: "hue-rotate(90deg)",
      filteropb: "hue-rotate(140deg) saturate(4) brightness(1.2) contrast(2)"
    };

    var elements = document.querySelectorAll('#videofilters input[type="radio"]');

    for (var e = 0; e < elements.length; e++) {
      elements.item(e).addEventListener('change', function() {
        _video.style.webkitFilter = filters[this.id];
      }, false);
    }
  };

  /**
   * Initialize the screenshot handler
   * @private
   */
  var _initializeScreenshot = function(videoStream) {
    _canvas = document.querySelector('canvas');
    _canvasContext = _canvas.getContext('2d');

    document.getElementById('vidcontainer').addEventListener('click', function() {
      _launchScreenshotEditor();
    });

    _downloadButton = document.querySelector('#screenshot button');
    _filenameInput = document.getElementById('imageName');

    _downloadButton.addEventListener('click', _downloadImage);

    document.getElementById('closeScreenshot').addEventListener('click', function(event) {
      _downloadButton.className = '';
      _filenameInput.value = '';
      _toggleScreenshotModal(_TYPE_HIDE);
      event.preventDefault();
    });

    var decorations = document.querySelectorAll('#screenshotdecorations img');
    [].forEach.call(decorations, function(decoration) {
      decoration.addEventListener('mouseover', function(e) {
        e.target.addEventListener('mousewheel', _resizeDecoration);
      });
      decoration.addEventListener('mouseleave', function(e) {
        e.target.removeEventListener('mousewheel', _resizeDecoration);
      });

      decoration.addEventListener('dragstart', function(e) {
        var style = window.getComputedStyle(e.target, null);
        e.dataTransfer.effectAllowed = 'move';
        //track id, and drag offset and layer offset
        var dataString = this.id + ',' + (parseInt(style.getPropertyValue('left')) - e.clientX) + ','
                       + (parseInt(style.getPropertyValue('top')) - e.clientY + ',' + e.layerX + ',' + e.layerY);
        e.dataTransfer.setData('text', dataString);
      });
    });

    _canvas.addEventListener('dragover', function(e) {
      if (e.preventDefault) e.preventDefault();
      e.dataTransfer.dropEffect = 'move';
      return false;
    });
    _canvas.addEventListener('drop', function(e) {
      if (e.stopPropagation) e.stopPropagation();
      var parts = e.dataTransfer.getData('text').split(',');
      var element = document.getElementById(parts[0]);
      element.style.left = (e.clientX + parseInt(parts[1])) + 'px';
      element.style.top = (e.clientY + parseInt(parts[2])) + 'px';
      element.className = 'moved';

      //find the part where it is on the canvas ** still missing something here
      element.setAttribute('data-location-x', (e.offsetX -  parseInt(parts[3])));
      element.setAttribute('data-location-y', (e.offsetY - parseInt(parts[4])));
    });
  };

  /**
   * Used to launch the screenshot editor and bring modal back
   * @private
   */
  var _launchScreenshotEditor = function() {
      _canvas.width = _video.videoWidth;
      _canvas.height = _video.videoHeight;
      _canvasContext.drawImage(_video, 0, 0);
      _canvas.style.webkitFilter = _video.style.webkitFilter;
      _toggleScreenshotModal(_TYPE_SHOW);
  };

  /**
   * Used to show/hide the screenshot editor window
   * @param type
   * @private
   */
  var _toggleScreenshotModal = function(type) {
    var screenshot = document.getElementById('screenshot');
    if (type == _TYPE_SHOW) {
      screenshot.style.display = 'block';
      document.body.className = 'modal';
    }
    else {
      var decorations = document.querySelectorAll('#screenshotdecorations img');
      [].forEach.call(decorations, function(decoration) {
        decoration.style.left = '0.3em';
        decoration.style.top = '0.3em';
        decoration.className = '';
      });
      screenshot.style.display = 'none';
      document.body.className = '';
    }
  };

  /**
   * Used to handle mouse key to resize decoration items
   */
  var _resizeDecoration = function(event) {
    var newWidth = event.target.width;
    var newHeight = event.target.height;
    var xChange = 10;

    if (event.wheelDelta < 0) {
      xChange = -10;
    }
    newWidth += xChange;

    if (newWidth > 500 || newWidth < 20) {
      return false;
    }

    var ratio = (event.target.height / event.target.width);
    var yChange = xChange * ratio;
    newHeight += yChange;

    event.target.style.height = newHeight + 'px';
    event.target.style.width = newWidth + 'px';

    return false;
  };

  /**
   * Used to handle the image download
   */
  var _downloadImage = function(e) {
    /** handle any images placed on it **/
    var downloadCanvas = document.createElement('canvas');
    downloadCanvas.width = _canvas.width;
    downloadCanvas.height = _canvas.height;
    var downloadCanvasContext = downloadCanvas.getContext('2d');
    downloadCanvasContext.drawImage(_canvas, 0, 0);

    var decorations = document.querySelectorAll('#screenshotdecorations img');
    [].forEach.call(decorations, function(decoration) {
      if (decoration.className) {
        var x = decoration.getAttribute('data-location-x');
        var y = decoration.getAttribute('data-location-y');
        downloadCanvasContext.drawImage(decoration, x, y, decoration.width, decoration.height);
      }
    });

    /** do download **/
    var imageDataUrl = downloadCanvas.toDataURL('image/png').substring(22);
    var byteArray = Base64Binary.decode(imageDataUrl);
    var blob = new Blob([byteArray], {type:'image/png'});
    var url = window.URL.createObjectURL(blob);

    var link = document.createElement('a');
    link.setAttribute('href', url);
    var filename = _filenameInput.value;
    if (!filename) {
      filename = _filenameInput.getAttribute('placeholder');
    }
    link.setAttribute('download', filename + '.png');
    link.addEventListener('click', function() {
      _downloadButton.className = 'downloaded';
    });

    var event = document.createEvent('MouseEvents');
    event.initMouseEvent('click', true, true, window, 1, 0, 0, 0, 0, false, false, false, false, 0, null);
    link.dispatchEvent(event);
  };
};
Whew! Let’s start with initCam(). Note: this is the only public method in this whole object/class. First, I get the getUserMedia function and the window.URL pointer. These differ between HTML5 compatible browsers. (Yes I know I’m only supporting Chrome at this time, but I wanted to make it future compatible if I expand this functionality.) It continues - if I don’t have getUserMedia() access, it shows the warning and quits. We can’t move on from here anyway!
The next call is to getUserMedia() and asks for access to the video stream. The callback method, executed when permission is added, does the following: it hides the permission modal box, initializes the canvas video stream, starts the availability of filters, and sets the screenshot handler. If it fails to initialize, the showBrowserWarning() method is ran again.
The next set of items is just variables local to this object.
The method _initializeStream sets the _video variable to our current video element. Then, set the video’s source to the object created from the videoStream we just got from getUserMedia().
_initializeFilters sets up all the available filters by their ID and their css to execute. Then, it uses document.querySelectorAll() (see, no jquery! hah) to get all the filter buttons and add listeners to them. So if one is clicked, that CSS is executed.
Moving on, _initializeScreenshot sets up the canvas and the canvas context in that hidden screenshot section. It also adds the handler to call _launchScreenshotEditor() if the video is clicked. It continues to add other handlers, most which are pretty straight forward.
The most interesting set of handlers is the dragstart and dragover ones. dragstart is added to the decoration. This tracks the ID of the current item being dragged, the current position of it, and the current position of the mouse cursor that is doing the dragging. This is important because we need to know what offset the mouse cursor is from the actual image itself when we go to place it. See, we get the calculation of mouse cursor movement, not item movement - so we need to apply the offset of the item later on to get the exact placement of the item when done. This is all sent to the dataTransfer object of this draggable item.
dragover just allows this to be a place where one could drop something. Finally, drop allows for the item to be dropped here. See, you can add the drop handler to all items where a draggable item can be dropped. The handler grabs the original location from the handler so it can calculate the offsets, then positions the dropped item properly.
The screenshot editor function basically sets the canvas to the size of the video, and then draws an image onto it from the video. It also grabs the style (filter) from the video and applies it to the canvas so that the look is the same. Finally it shows the modal.
_toggleScreenshotModal() is responsible for showing the modal and applying the proper styles to the body, or hiding it, resetting the position of the decorations, and hiding the screenshot modal.
The _resizeDecoration method just determines if the delta change of the mousewheel is positive or negative, and then applies that transformation to the target element. The width and height need to be changed equally, however, so the ratio is calculated ot make sure this is done properly.
Finally, on to _downloadImage(). I’ve seen a lot of people send the base64 string to a php script via iframe (ajax won’t prompt a download dialog, but iframe will)- but I didn’t want to do that. This creates a new canvas (because I don’t want to modify my current displayed one by adding decorations to it), and clones the image that was drawn to that canvas. Next, it loops through each decoration and places it as a drawn image on my new canvas. Next, the toDataURL() method is called to return the base64 image data which is passed to the byteArray. The byteArray is passed to an HTML5 Blob with the proper mime type created. Then, a URL is created from that blob that will prompt an octet-stream download. The filename is retrieved from the input box or from the placeholder, and the download link is created, and then clicked. This prompts the user for a download.
The end!
I’m sure I could do this better. Remember, the filters are not actually applied. I could make it more cross browser and more able to be on different display sizes. But overall, I wanted to prove it could be done.